How to Create a Crossfade Effect in CapCut on PC (2025)
Want to make your video transitions smoother and more professional? Crossfading is one of the best ways to achieve seamless transitions between clips. If you’re editing a vlog, a music video, or a short film, learning how to apply a Crossfade Effect in CapCut on PC will take your content to the next level.
A crossfade effect is a gradual transition between two video clips or audio tracks, where the first clip fades out while the second one fades in. This effect is widely used in professional video editing to create smooth, seamless transitions that don’t distract the viewer. Whether for visual or audio purposes, a crossfade can add a polished touch to your project.
How to Create a Crossfade Effect in CapCut on PC?
Step 1: Install and Open CapCut PC Version
First, if you haven’t already, make sure you’ve downloaded and installed CapCut on your PC. You can grab the installer from the official CapCut website or app store. Once installed, open the app to begin editing.
Step 2: Import Your Video Clips
Once you’re in the CapCut editor, you’ll first need to import the video clips you want to work with. To do this:
- Click on the Import button (usually located at the top left corner).
- Select the video files from your computer and import them into CapCut.
Step 3: Add Your Clips to the Timeline
Drag and drop the clips onto the timeline in the order you want them to appear in the final video. Please ensure the clips are positioned next to each other with no gaps between them.
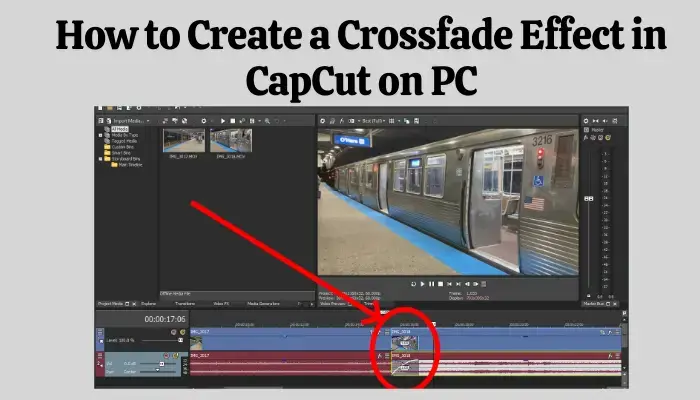
Step 4: Apply the Crossfade Effect
Now, it’s time to add the crossfade transition between your clips. Here’s how:
- Click on the Transition tab located in the menu.
- Look for the “Crossfade” effect (usually under the “Basic” or “Fade” categories).
- Drag and drop the crossfade transition effect between the two clips in the timeline.
Step 5: Adjust the Duration of the Crossfade
You can tweak the crossfade duration to make the transition faster or slower. To do this:
- Click on the crossfade effect on the timeline.
- A small window will appear, allowing you to adjust the duration by dragging the edge of the effect left or right.
- Experiment with the duration until you’re happy with the smooth transition.
Step 6: Preview the Effect
Once you’ve applied and adjusted the crossfade effect, hit the Play button in the preview window to watch how it looks. Make sure the transition feels seamless and doesn’t feel too abrupt or too slow.
Step 7: Export Your Video
After you’re satisfied with your crossfade effect and other edits, it’s time to export your video:
- Click on the Export button at the top right corner.
- Choose your export settings, such as resolution and format.
- Hit Export again to save the video to your computer.
Tips for Perfecting Your Crossfade Transition
- Use with Audio: Crossfade isn’t just for video! You can apply a crossfade to your audio tracks as well, creating a smooth transition between songs or sound effects. The process is the same—just add the audio files to the timeline and apply the crossfade.
- Use Multiple Crossfades: For longer videos with more clips, don’t hesitate to use multiple crossfade transitions. This helps keep the flow smooth and visually engaging.
- Play with Timing: Experiment with the timing of your crossfade effect. A longer fade may work well for emotional scenes, while a quick crossfade can keep things snappy and fast-paced.
Why Use Crossfade in CapCut?
Using crossfade transitions in your videos can:
- Enhance Smoothness: Crossfades eliminate jarring cuts between clips, making your video feel more cohesive.
- Professional Quality: Adding a crossfade shows professionalism and attention to detail in your editing.
- Improve Viewer Experience: Smooth transitions help engage your audience and provide a more polished final product.
Conclusion
Mastering the crossfade effect in CapCut APK on PC is an easy yet powerful way to elevate the quality of your videos. Whether you’re creating content for YouTube, Instagram, or personal projects, adding this simple transition can make all the difference. So, follow these steps, get creative with your transitions, and watch your videos stand out with professional-level editing!